
Neon X360 Manual
Controller 4: Tunnel and Star
OK, this is one of the most fun controllers to use. Many of Neon/360's effects are based on tunnels, as you doubtless have noticed. The main function of controller 4 is to allow you to control those tunnels.
First off, let's find an effect that has a big obvious tunnel in it. Make sure you have 4 controllers active, then use controller 1 to navigate to this effect in the matrix:
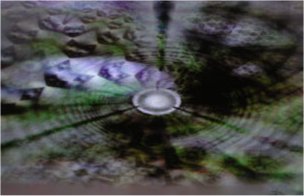
Pick up controller 4 and get ready for some tunnel fun. First let's address the right analog stick. Push and hold it to the left or right and you should see the tunnel appear to spin. (It isn't *really* spinning - what you're actually doing is rolling the tunnel texture around the inside of the tunnel). Play with this and notice that, as I am sure you are not surprised by now, the speed with which the tunnel "rolls" is proportional to how far you displace the stick.
The Y axis on the right analog stick controls the speed of propagation of the tunnel, and thus the speed with which you appear to "move" down the tunnel. Press the right analog stick all the way up to accelerate to maximum speeed, and press it all the way down to slow to a standstill.
Fun, isn't it? Play with it until you are happy with everything you're doing with the right analog stick, then we'll move on to the left stick.
Right, now I need to explain how tunnels are made. Basically they propagate from a point off in the distance "ahead" of your position in the tunnel (that is the direction the tunnel appears to move from - bear in mind that as the camera control is working you may not actually be "looking" in that direction - it is quite possible for the camera to be pointing back down the tunnel so that you see it receding away from you rather than moving towards you).
The left analog stick is used to introduce "bend" into the tunnel. It *doesn't* bend the whole tunnel instantaneously, since we want specifically to provide the feeling of progressing down the tunnel and encountering upcoming bends, rather than just having the tunnel flex around us instantaneously - this gives a much better impression of "travel" down the tunnel.
This means that when you use bend you have to get used to the fact that your bend commands don't appear instantaneously. The bends are introduced up front, where the tunnel originates, and propagate down the tunnel at a speed determined by the tunnel velocity which you set with the right analog stick vertical axis.
Don't worry, this probably sounds more complex than it actually is. The best way to understand it is to use it, so pick up the controller and press the right analog stick all the way up so you are going at maximum speed down the tunnel. Then try holding the left analog stick all the way over to the left or right - after a short delay while the bend command propagates down the tunnel, you should see the tunnel bend.
Now just try playing with the bend stick - try wiggling it, try gently rolling it around, just play with bending that tunnel. Try reducing the speed gently using the right stick Y axis. Notice how the bend commands take longer to propagate down the tunnel.
Just play with it all. It's really fun. You might try saing "Wheeeee!" a few times as you do so.
As with many of the controls there are changes you can introduce using the d-pad, too. Tunnels can be made up of two textures blended together, and pressing the d-pad left and right changes one of these textures, and pressing it up and down changes the other. Play with that too and notice that when a tunnel is in the effect then d-pad changes to the tunnel can have quite a major effect on how everything looks.
Finally, make yourself a tuna sandwich and a nice cup of tea, and use controller 1's d-pad to select effects that have tunnels in them, and spend time applying what you've learned about the tunnel controls to use controller 4 to play with them.
Tunnels are fun :).
OK, there is one more thing that controller 4 sometimes gets to control (although it's usually tunnels) - an effect called Star.
Navigate to the following effect in the matrix:
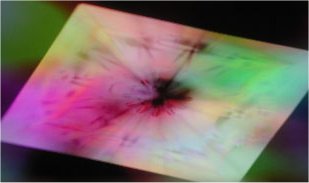
Again, because it's a bit unclear from the pictures in the matrix map, this isn't the actual one we're going to use to practice, it's just an easily recognisable one to find. Get to there and then go one step left to find the one we're going to use.
Notice that there is a structure that looks a bit like a tunnel, but made of transparent pyramid sort of things in the middle of the effect - that is Star, and it's controlled in a roughly similar way to tunnels, except that it can't be bent like tunnels can.
Play about with the right analog stick on controller 4. Up and Down controls the direction and velocity with which the star effect moves, and left and right controls how it spins. Play with this and notice that due to the nature of the effect changing the velocity also introduces a degree of spin itself. Play with the stick and practice balancing the velocity and spin controls to get the effect you want.
The left analog stick is much more subtle in this effect. In order to see clearly what it does you'll probably need to set Star so that it is almost stationary. Do so,m then look carefully at the pyramids that make up the effect, and move just the left analog stick. You should see that moving the stick displaces the textures that are applied to the pyramids. Hopefully you'll see it, it's pretty subtle.
Star also uses two palette generators to colour itself, and as for Boingy, you can select those by using the d-pad on the controller - up and down to step through one set, left and right to step through the other.
Right, that's about it - I think we have covered every major function of all the controllers.
In Conclusion
First and foremost, get other interested people to learn the controls, and use them together. I can't emphasise enough how much more cool it is to use Neon together as a group than it is to use it alone. You'll see parts of the parameter space that you simply would never get to see with things left to auto, and you'll learn to work together as a Crew to interpret the music visually. It may sound silly, but we've been doing just that at Llamasoft for the last couple of years. I can't think of any game or other piece of software that gest used more than Neon, and our Crew will regularly travel miles across the country to meet up and spend the night "flying" Neon together.
Remember that although you now know the primary functions of each controller, there are a few effects where the functions are different. If your familiar component isn't in the effect, experiment with the controller until you see what it is you are controlling.
Sometimes what you control may be "back in the mix" and not right upfront and obvious like controller 1 and the camera. There could be a couple of tunnels in parallax and you're controlling only one while the other is on auto. Your Boingy or Psychedelia may be mapped onto something else that is itself used as a displacement map over the whole scene. Learn to find out "where you are" - use the d-pad of your particular controller to effect changes that will be more visible in such a case, such as colour and texture changes, then once you've found where you are, use the analog sticks as well.
Most of all, just experiment and have fun. It's impossible to do anything "wrong" in Neon, and if you don't like what you've made just switch to another effect and back again to reset the original effect - nothing you change is permanent and nothing can be harmed or destroyed.
And, if you've read this far and acquired the controllers in order to be able to put all of it into effect, and you really like and enjoy Neon - watch out for future developments from Llamasoft, because Neon is a concept that we are developing and extending all the time. We have a PC version coming out which is far more versatile and allows you to import your own textures and live video for use in effects, and an editor which allows you to create entirely new effects yourself, and save and share them with other Neon users.
We will also be bringing more Neon-based developments to the X360 too }:-).
More >>>